Amazon UK

Tuesday, 30 January 2018

Why a Nikon Shooter Bought a Fuji X100F as a Second Camera

In this article (I don’t want to call it a review because) I’ll share my thoughts on why I picked up a Fuji X100F as a second camera alongside all my Nikon gear. And why I love this little camera!

My journey into serious digital photography began in the spring of 2012 when I realized my little pocket camera wasn’t cutting it anymore. After consulting with some friends, my wife and I picked up a Nikon D200 and 50mm prime lens and the rest, as they say, is history.

Over the years our collection of gear has grown to include three Nikon bodies, several lenses, and a host of accessories all of which have come in handy with our family/child/high school senior photography hobby we run on the side. However, after much research and soul-searching (or perhaps you might say goal-searching), I recently added a Fuji X100F to my collection of gear and I thought I’d share some of my reasons why in case you might be going through the same thought process we did.

Why a Nikon Shooter Bought a Fuji X100F as a Second Camera

The Fuji X100F might just be my favorite camera of all time. (Note the camera also comes in retro silver)

Know your needs

Almost any time a club, business, or other organization sets out to improve a particular aspect of its operation the key stakeholders involved perform what’s known as a needs assessment. This is a formal process that aims to help organizations understand gaps or areas of deficiency which can be addressed. They help to guide the improvement so that it is done in a way that matters most. In similar fashion, a needs assessment can make all the difference in the world to photographers as well.

When my wife and I bought that D200 years ago we weren’t exactly sure what our needs were, other than that we wanted better pictures of our newborn son. That camera and lens worked beautifully for a while but soon we started to realize that it had some issues which were hard to overlook.

We learned that the 50mm lens was too restrictive indoors and images that were taken at ISO 800 and above were quite noisy which limited our ability to use this set of gear in challenging lighting conditions. These deficiencies led us to buy a Nikon D7100 and a 35mm lens which enabled us to take pictures at wider angles and in lower-light conditions, and once again our needs were met. For a while.

Why a Nikon Shooter Bought a Fuji X100F as a Second Camera

The Nikon D200 + 50mm lens worked fine, but before too long its limitations started becoming much more apparent and I wanted something more. And as this photo shows, I also needed to work on my photography skills such as composition and light!

Know when to upgrade

As time went on and we became more invested in the Nikon system, I started to once again see some significant limitations of our camera gear. My wife and I were doing more portrait sessions which necessitated the purchase of an 85mm lens and external flash. But at the same time, we felt as though we didn’t quite have the right gear to take the type of pictures of our kids with which we were really happy.

The 35mm lens was nice, but on a crop-sensor body like the D7100 or D200 it wasn’t wide enough for everyday casual use and I often found myself in low-light situations where the high ISO performance of the D7100 just didn’t cut it. Enter the full-frame Nikon D750.

Bear with me, I’m getting to the Fuji X100F!

As we examined our own particular photographic needs we realized that the D750 ticked all the boxes that we had at the time: great low-light performance, superb image quality for portraits, tougher build quality, a larger image buffer, and the list goes on. The D750 seemed like a good logical choice and over time it has only grown more useful. Even my 35mm lens specifically designed for crop-sensor Nikon DX cameras works fine as long as I shoot at about f/4 and don’t mind a bit of vignetting in the corners.

Why a Nikon Shooter Bought a Fuji X100F as a Second Camera

The D750 and a 70-200 lens make family portraits like this possible.

More gear, more problems

Ironically, despite getting more gear, the more limited I still felt in terms of taking everyday photos of our kids – which was the whole reason my wife and I got into digital photography in the first place!

My favorite camera/lens combination quickly became the D750 + 35mm and I found myself using that particular setup almost every time I wanted to just go out and shoot candid pictures of my wife and kids. I took that camera and lens whether we were on vacation, in the backyard, or even on a visit to the park.

The problem was that it is so big and heavy I often found myself leaving it at home and using my iPhone instead, which works fine as long as there’s plenty of light. As soon as the sun goes down or you move indoors, the quality difference between a mobile phone and a larger camera quickly becomes apparent.

Why a Nikon Shooter Bought a Fuji X100F as a Second Camera

The Fuji X100F with 23mm lens is almost exactly the same as a Nikon D750 and 35mm lens, but the sheer size and weight of the Nikon meant I often left it at home. The Fuji gives me almost the same image quality and I can literally take it almost anywhere.

Is yet more Nikon gear the answer?

Professionally, our growing collection of gear brought with it some headaches too. I found myself using the D750 + 70-200mm f/2.8 lens on most of my paid client shoots, but it is really heavy and not at all conducive to close-up shots in small spaces. I had other cameras and lenses but nothing that gave me really good shots with a wider field of view, so for a while, I contemplated getting another D750 and a true full-frame 35mm lens.

However the idea of adding even more gear to my bag, while still not really having a good all-purpose camera I could use with my family, threw me into a bit of a mental slump. I had a clear need that was unmet, but I didn’t want the Nikon gear required to solve the problem.

And then I found the Fuji X100F!

Why a Nikon Shooter Bought a Fuji X100F as a Second Camera

The D750 and a 35mm lens are great for more intimate shots like this, but the size and even the clack-clack-clack sound of the shutter make it somewhat conspicuous.

Form following function

The more I looked at my needs as a photographer the more I realized I was going about things all wrong. Instead of asking myself, “What needs to I have and how can I meet them?” I was stuck in the mindset that I had to stay with Nikon gear because that’s what I already had. I was putting form (i.e. Nikon) over function (what I wanted my gear to do).

Professionally, I had the midrange and telephoto focal lengths covered but I didn’t have anything on the wider end. Personally, I knew I didn’t have a truly portable go-anywhere camera. I was looking for a way to solve these issues with my mind firmly planted in Nikon’s pastures, all the while not realizing that other camera systems might have a much better answer.

Look outside the box

When I discovered the Fuji X100F I realized that it ticked off every single box on my list. Professionally it allowed me to get the kind of close, wide-angle, intimate pictures I couldn’t get with any of my other gear. It was also small and light enough that I could be discrete at events and even carry it as a second body with my heavy D750 and 70-200mm lens doing the heavy-lifting.

The 23mm lens paired with an APS-C sensor meant I would have almost the exact same field of view as shooting at 35mm on a full-frame camera. The wide f/2.0 lens aperture meant that I could get great shots in low light, and even the price was right since the cost of the X100F was less than another Nikon D750 and full-frame 35mm lens.

Why a Nikon Shooter Bought a Fuji X100F as a Second Camera

Finally – the answer was the Fuji X100F

Personally, the Fuji X100F became my go-to camera for almost any situation I found myself in with my family: birthday parties, playing in the yard, going to friends’ houses, taking trips to visit family, and even going on vacations. Prior to getting the X100F, my D750 and 35mm lens were what I used in almost all of those situations. Not only was it heavy and cumbersome, I also felt highly conspicuous taking pictures in casual settings. It’s hard to ignore someone who is wielding a giant DSLR and pointing it in your face!

As an added bonus the leaf shutter in the X100F is almost silent which makes picture-taking in quiet situations much less worrisome. Further, if you want to be really quiet you can enable a fully electronic shutter which lets you take pictures in complete silence. No DSLR can do that, even in Live View, and it’s something I have really come to appreciate about the X100F and other mirrorless systems.

Why a Nikon Shooter Bought a Fuji X100F as a Second Camera

Shot using the X100F’s built-in ACROS black and white simulation mode.

Finally, the wealth of manual buttons and dials on the X100F has been nothing short of a revelation for someone like me who cut his photography teeth long after digital cameras had supplanted most film cameras. Being able to look at my camera and see separate dials for shutter speed, aperture, and ISO means that I no longer have to hunt through menus or assign functions to control dials to get the shots I want.

Add to this the film simulations like Classic Chrome and ACROS, tough-as-a-tank build quality, and the choice to use either an LCD screen or electronic viewfinder and you end up with a camera small enough to take anywhere yet versatile enough to excel in almost any situation.

Finding your solution

I often read articles online about switching from DSLR to mirrorless or vice versa, and there seems to be a persistent debate about which one system better. After my experience with adding a Fuji mirrorless camera to my Nikon DSLR kit, I’ve come to the realization that it’s not about which is better but what gear can meet your needs.

I think the problem that some photographers have, myself included, is that we aren’t good at honestly identifying what problems or needs we have and then working from there to find our answers.

Why a Nikon Shooter Bought a Fuji X100F as a Second Camera

There’s no bad choice – only the right choice for you

Cameras today are so good it’s almost impossible to not get one that doesn’t have great image quality, autofocus, high ISO performance, dynamic range, and so on. What’s much more difficult is finding a camera, lens, or another piece of gear that solves whatever problem you currently have.

There are a time and place for big DSLR cameras, small mirrorless systems, micro-four-thirds models, even mobile phones and computational photography. Each has its own benefits and drawbacks, and each can meet different needs and work fine for you as long as you take the time to find out what your needs really are.

Why a Nikon Shooter Bought a Fuji X100F as a Second Camera

High ISO performance of the X100F isn’t quite as good as a full-frame camera, but it’s not too shabby either.

Conclusion

Going forward I see myself using my Nikon gear for more professional shoots and the Fuji camera as a daily driver that will be more for casual shooting, but it’s not an either/or situation. My old crop-sensor D7100 paired with the 70-200mm f/2.8 lens is fantastic for getting pictures of my kids playing sports, while the Fuji X00F is ideal for indoor family sessions or times when I just don’t want the heft of a DSLR.

Who knows, my next camera might be something totally different or it might not be a camera at all and instead be some lessons or even just a trip to see and photograph different places.

Why a Nikon Shooter Bought a Fuji X100F as a Second Camera

Shot using the Fuji X100F’s built-in Classic Chrome film simulation mode.

After hearing my story I’d love to get your input too. What kind of gear do you use, why do you use it, and what steps are you planning to take next to address any issues you might have? Please leave your thoughts in the comments below.

The post Why a Nikon Shooter Bought a Fuji X100F as a Second Camera by Simon Ringsmuth appeared first on Digital Photography School.


from Digital Photography School http://ift.tt/2nrIXJ4
via IFTTT

Hey #2: Samsung 64GB 100MB/s Memory Evo Plus Micro SD Card with Adapter https://t.co/pxVIUt7DpF via @juko101


from Twitter https://twitter.com/GreatTechUK

January 30, 2018 at 05:44PM
via IFTTT

Kodak’s Dubious Blockchain Gamble


By KEVIN ROOSE from NYT Technology http://ift.tt/2E1kB3f
via IFTTT

New eBook: STREET HUNT: Street Photography Field Assignments Manual

BBCTech : RT matthew_wall: Basic stats-based reports can already be generated by algorithm, but what happens when human-mimicking AI gets involved? https://t.co/oXxtf46A6L (via Twitter https://t.co/O5f7JYVVZp) https://t.co/SblJfxh48q


from Twitter https://twitter.com/GreatTechUK

January 30, 2018 at 02:24PM
via IFTTT

Amazon, Berkshire Hathaway and JPMorgan Team Up to Disrupt Health Care


By NICK WINGFIELD and KATIE THOMAS from NYT Technology http://ift.tt/2rTY8Qw
via IFTTT

How to Make 5 Different Looks using Aurora HDR 2018

Aurora HDR 2018 has plenty of tricks up its sleeve, and one of those is versatility. It’s not a one-trick pony when it comes to creating your HDR look. The range of different tools really allows you to create a huge variety of looks really easily. Part of that is knowing what your available tools do. The other part is just playing around and exploring your own creative side!

In this article, you’ll see five different looks in HDR and how you can recreate them – but on top of that, you’ll also get them in preset form to use yourself. You’ll also get to see some of the new Lens and Transform options inside Aurora HDR 2018.

Plug it in

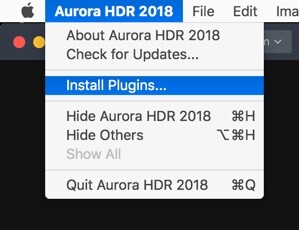
Aurora HDR 2018 doesn’t have a way to manage files, but can easily be used from other applications including Lightroom. In fact, you’ll even be able to process the files using Aurora’s built-in HDR processor, so you’re not trying to combine three already rendered files. To run Aurora HDR 2018 from inside Lightroom, you’ll need to run the standalone version first. From the Edit menu on PC or the Aurora HDR Menu on Mac, choose the Install Plugins.. menu item.

How to Make 5 Different Looks using Aurora HDR 2018

From the dialog that appears, choose the host applications that you want to use.

How to Make 5 Different Looks using Aurora HDR 2018

Back in Lightroom, once you’ve selected the bracketed exposures you want to edit, go to the File menu and from the Plug-In Extras menu, choose Transfer to Aurora HDR 2018.

How to Make 5 Different Looks using Aurora HDR 2018

Getting Started in Aurora

Aurora HDR 2018 will load up with your selected bracketed sequence. I’ve chosen these photos specifically because they have lens distortion and a crooked horizon, which you’ll see how to correct shortly.

Once the files have loaded, you can set about working with alignment and ghosting settings. You’ll see the sequence and the bracketing interval in the photos. To align the photos if you’re not on a tripod, click Alignment. To access the other settings, click the cog you see on the bottom left (see below).

How to Make 5 Different Looks using Aurora HDR 2018

If you’ve got photos with moving objects in them, such as waves, trees in the wind or moving people, turn Ghost Reduction on. Choose your preferred reference image, and how strong you want the reduction to be. Color Denoise helps remove noise but increases the time your HDR takes to render. Finally, turn on Chromatic Aberration Removal to automatically get rid of color fringing on your photo.

How to Make 5 Different Looks using Aurora HDR 2018

How to Make 5 Different Looks using Aurora HDR 2018

Lens and Perspective Corrections

In the Filters header, you’ll see two icons. The first is for Perspective corrections or Transform (including rotation) and the second for Lens corrections.

The little odd looking shape is for Perspective and the round one is Lens Corrections.

You can fix rotation here (or using Crop as well) by clicking the Perspective icon. Rotation of 24 and Scale of 50 correct this image nicely.

How to Make 5 Different Looks using Aurora HDR 2018

Transform sliders correcting perspective.

Your penultimate step before going to the individual HDR looks is to fix the bow in the horizon caused by the wide-angle lens. A setting of 18 looks good for this photo. It also reveals that 24 was too much in the previous step, which you can always fix by going back to Perspective correction. 19 looked better zoomed in.

Lens Correction fixing distortion caused by wide lenses.

As the photo is a little underexposed, boosting the Exposure before going to create your looks is probably a good idea. While you may need to change this for each look, an additional stop is a good start here.

How to Make 5 Different Looks using Aurora HDR 2018

#1 Photo-Realistic

For your first look, something photo-realistic is the best approach. You’re not trying to get anything gritty, or super desaturated, or over saturated here. We’ll get to that later.

For this look, use HDR Basic, Color, and HDR Denoise. In HDR Basic, smooth out the dynamic range by reducing Highlights and increasing Shadows. Smart Tone of 44 also helps it along. HDR Enhance (formerly Clarity) brings up some nice detail, 50 is looking well here. Your aim is to get the best looking photo you can before tweaking the look – this will be true of all looks.

How to Make 5 Different Looks using Aurora HDR 2018

The color is a little flat so in the Color panel, you can boost both Saturation and Vibrance to +20. Color contrast, which controls the contrast between the primary and secondary colors looks good around 20 as well. You’re not aiming for extremes here, just to get a good looking photo.

How to Make 5 Different Looks using Aurora HDR 2018

You’ve probably noticed the noise in the clouds at this point. This is where HDR Noise comes in. Setting this to around 25 softens up the noise.

How to Make 5 Different Looks using Aurora HDR 2018

And that makes your first look, a photorealistic HDR photo.

How to Make 5 Different Looks using Aurora HDR 2018

#2 Gritty HDR

With the basic look out of the way, it’s time for the more surrealistic to take over.

Start by using the History Panel to reset everything to your original starting point AFTER increasing the Exposure +1 and applying your Perspective and Lens Corrections. The History Panel records every action you take in Aurora HDR in chronological order, so simply select the last action after the ones you’d like to save, then begin the next edits. The History Panel will begin recording any edits from there leading to your Gritty HDR look!

Now it’s pretty flat and bleak, so you’re going to take it even further in that direction.

How to Make 5 Different Looks using Aurora HDR 2018

Set your HDR Enhance to +100 to get the bleak and gritty ball rolling. Smart Tone of -50 darkens the photo as well, and a hint of Vibrance (+15) gives color to the sky, while leaving the rest of the photo muted.

How to Make 5 Different Looks using Aurora HDR 2018

To complete your gritty look, go to the HDR Structure panel. In the top section, set Amount to 25 to begin to increase detail in the photo. Increasing Softness (+80) makes the detail more realistic, while Boost accentuates it (+75). The latter two sliders might seem at odds, but a quick play shows they complement each other rather than compete.

HDR Microstructure boosts micro contrast, while Softness makes it more realistic. By increasing Amount to 71 and Softness to 28, you’ll get even more detail. You may even like the noise that this processing adds to the photo. I think it’s a big part of the look.

How to Make 5 Different Looks using Aurora HDR 2018 - gritty HDR look

And now you have your classic gritty HDR look!

How to Make 5 Different Looks using Aurora HDR 2018

#3 Warm Ethereal

At the opposite end of the spectrum is a soft and ethereal look. There are two different variations you can have on this, and they depend on using Image Radiance or Glow (and combinations of each). So with a reset to your basic corrected photo, let’s begin again!

A good beginning would be for a warmer look, so set your Temperature in HDR Basic to 10. While Image Radiance does have a Warmth slider, Temperature is much more effective. This look is all about Image Radiance. Set your Amount to 75 to really give the image a glow. Smoothness affects the softness of the image, and in this case, you’ll probably agree, it’s a little too soft, so set it to -50.

Overall at this point, the photo is too bright, so a reduction in Brightness to -76 helps. Darkening Shadows also helps. Finally, for Image Radiance, an addition of +61 Vividness to boost the saturation, while Warmth just adds another hint of yellow tones in a more controllable way than with Temperature.

How to Make 5 Different Looks using Aurora HDR 2018

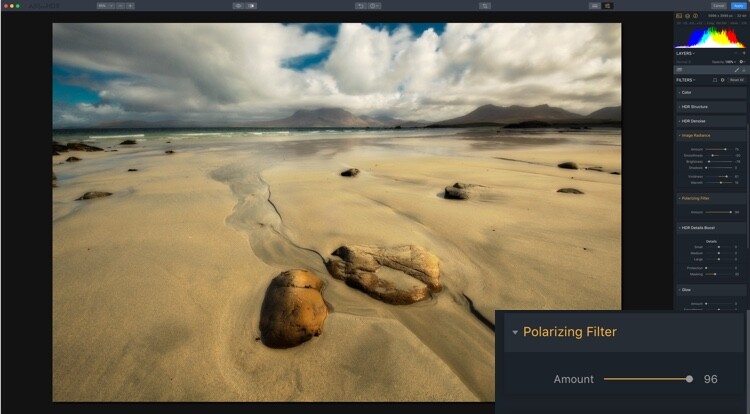
There’s a lot of warmth in the photo (in a good way), but you may want to add a little contrast of color into it. By using the Polarizing Filter, you can add more blue to sky, emulating a real circular polarizer.

How to Make 5 Different Looks using Aurora HDR 2018

The final thing for this look is for you to introduce a little global detail using HDR Detail Boost. As you can guess Small affects the fine detail, Large affects the global contours of the photo, while Medium controls the details between Small and Large.

To sharpen the global edges, you can push Large. This firms up the edges while retaining the softness that Image Radiance has created. Protection protects fine detail while Masking controls where the effect is applied with 30-70 being optimal.

How to Make 5 Different Looks using Aurora HDR 2018

So that’s your first ethereal look.

How to Make 5 Different Looks using Aurora HDR 2018

Warm Ethereal

#4 Soft Glow

Your second ethereal look uses Glow. Reset your photo again to the settings at the start of the looks. Because Glow works on the Highlights, it’s probably a good idea to reduce your Exposure down to 0.60. Now, go to Glow and set the Amount to 50. A fog settles over the photo. This would work better on a dark evening scene that a sunny day, but you get what it does.

Now that you know what Glow looks like, it’s time to get a little wacky. Start by setting your Smart Tone to -100, and HDR Enhance to 56. This reduces some of the Glow, so set that Amount to 94. You probably want to go a bit wilder with Color, so set Saturation at 50 and Vibrance much higher, at 70. A hint of Color Contrast gives even more of a boost at 30.

How to Make 5 Different Looks using Aurora HDR 2018

For the final part of this look, add +30 Amount from Image Radiance to enhance the glow.

And that’s look #4.

How to Make 5 Different Looks using Aurora HDR 2018

Soft Glow

#5 Nitty Gritty Black & White

And now for something completely different – a nice gritty Black & White. Again, begin with a reset. Now, in Color, turn the Saturation down to -100.

Before going for grit, you’ll need to get contrast right. A few tweaks will get it to a workable point. It’s not set in stone at this point though.

How to Make 5 Different Looks using Aurora HDR 2018

And now you get to go for grit! You can use all the tools from previous looks that gave more detail, so HDR Enhance, HDR Structure, and HDR Details Boost apply. Go wild. This is definitely one for your own taste. The settings used here were HDR Enhance 40, HDR Structure Amount 40, Softness 20 and Boost 50. HDR Microstructure is Amount 47 and Softness 50. HDR Details Boost has Small 31 and Large 50.

How to Make 5 Different Looks using Aurora HDR 2018

Here’s the final look.

How to Make 5 Different Looks using Aurora HDR 2018

Nitty Gritty Black & White

Presets

And here are the five presets for you to use:  HDR-5-Looks-Presets. Download the file and unzip it, then save it on your hard drive.

To install the Presets, open the standalone version of Aurora HDR 2018. From the File menu select Show Presets Folder. Drag the new presets folder (you must unzip it first) into that one. Restart the program to have the presets show up in Aurora HDR 2018 (look under User Presets).

Go out there and have a bit of fun with your HDR images, and post your results in the comments below.

Disclaimer: Macphun, soon to be Skylum, is a dPS advertising partner.

The post How to Make 5 Different Looks using Aurora HDR 2018 by Sean McCormack appeared first on Digital Photography School.


from Digital Photography School http://ift.tt/2DZ1Jlf
via IFTTT